
I don't think I ever posted my first finished bedroom curtain. But I talked about it and a few people expressed an interest in a tutorial. So here it is. I am by no means an expert, this is just the way I've figured out how to make a no hem curtain. These are my finished curtains.

And closed so you can see how full they are. One panel extended all the way will cover the full window.

Supplies:
- curtain fabric (we'll measure in step 1). You can use any weight you like, I used home dec. Just remember your curtain rod needs to be strong enough and far enough from the wall to accommodate the weight and fullness of the fabric and lining you choose.
- lining fabric. Again, the weight is up to you. I used black out weight because this is our bedroom and I wanted dark for those rare mornings the kid actually sleeps in.
- thread to match curtain fabric
- walking foot (optional)
- heavy duty needles. I used the Jeans/Denim weight needle.

- Grommets. I used Dritz (You can get these at Joann or Amazon). I don't know if there are better ones available, this is just what I found that didn't require any tools to install them.

First step is to measure your windows. Make sure your curtain rod is already in place.

Measure from the rod (and maybe an inch above) to the length you desire (mine are only going a few inches below the windowsill because I'm adding furniture under the window). Add about 6 inches for the top hem and only about 1 inch for the bottom "hem". This measurement will be cut from your length of fabric.
For your width measure the width of the rod. The general rule for fullness is to multiply that by two for your entire set of drapes. Another way of saying that is that I'm making two panels, each is the width of the curtain rod. This way it gathers with a nice fullness. This measurement will be made up of your width of fabric. In my case 54".
Once you have these measurements this is how we determine how much fabric to use:
In my case the length was 56"+ 7" for hem (top and bottom). 63" total for one panel length.
My WOF is 54" and the window width is 76 inches so I know that I need 2 WOF per panel to cover the whole window.
Per panel I need: 63" (length) x 2 (wof) = 126" or 3.5 yrds
I need 4 panels (2 per window). So I need 3.5 yrds x 4 panels = 14 yards (gasp right? this is another reason I didn't make them go to the floor!)
Write down your measurements and get your fabric and liner and you are ready to go.

I didn't do an exact seam allowance, just sewed next to the selvedge so that they are hidden in my seam allowance.

Now you need to cut out your lining fabric. I laid out my decorative panel and then laid out the liner on top for cutting. Since they were so large, I didn't trust my measurements. You could measure and cut instead. I chose to crawl around the floor. (also, in this photo I had my first curtain already done and was using that to measure so the 2nd panel matched. That is why you see grommets already attached).

Sew down your lining to the right side of your decorative fabric starting with the bottom edge. Then do the sides leaving the top open. Again, make sure you sew within your selvedges.
This is where the optional walking foot comes into play. The lining fabric can be sticky. If you do not use a walking foot, make sure your lining fabric is on the bottom when you sew. If you have a walking foot it can be on the top or bottom. It just needs those feed dogs to help it go smoothly.

*side note - I don't know which side of the lining fabric is correct to have facing out. My research showed people who said both sides were correct. I think it's just personal preference.
Clip your corners and turn your curtain right side out. You should iron your sewn edges at this point so they will lay nice and flat.

If you prefer, this would be the point to zig zag or serge your raw top edge to keep down any fraying. I left mine alone.
Next is the most time consuming part, the top hem. Lay out your curtain
and fold over the top, measuring from top to bottom to make sure you
have the length you want.
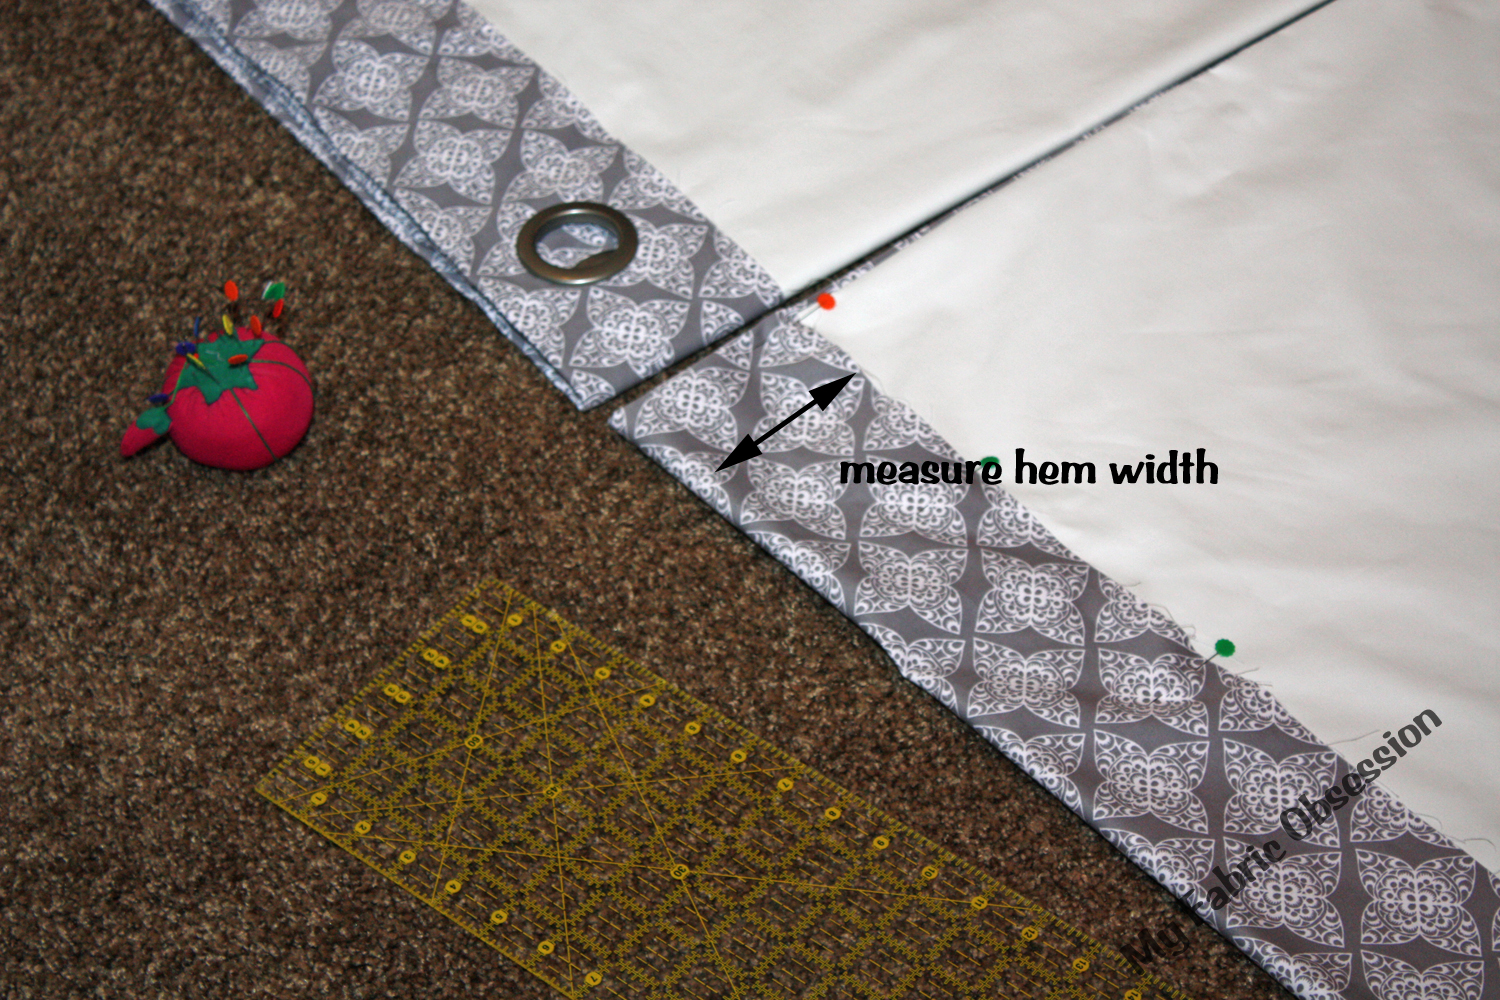
I find it easiest to then measure the top hem and use that measurement across the top to make sure everything is straight. That way you are only measuring 4/5 inches rather than the entire curtain length.
Before you pin that down, pull out one of your grommets and eyeball where you want it to go. Trim your lining fabric so it will not be under the grommets. I learned that these things do not like excess thickness. But keep your lining fabric long enough so it will be sewn under the hem.
Sew your hem down with your matching thread.
Now it's time to add the grommets. Using the template in the package mark the circles where you want to place your grommets and cut them out. If you left your lining fabric within those circles cut it out so only the fabric will be within the grommet. They won't snap otherwise.

Snap in the grommets. You will need a hard surface underneath you to press against. These take a little bit of muscle.

Once they are in, you are ready to hang them! Voila! I hope you found this helpful. I'd love to know if you use this or if you have a different way of doing this.


4 comments:
Cool tute! Thanks for sharing this!
Awesome tute! Thanks! The curtains look GREAT!
Great tutorial! I am bookmarking this. I need to make curtains in the worst way - this will certainly help!! Hope you had a nice Thanksgiving!
It was great of you to share your process, Becky! And your new curtains look lovely. I hope you get to use the blackout function occasionally. ;)
Post a Comment